

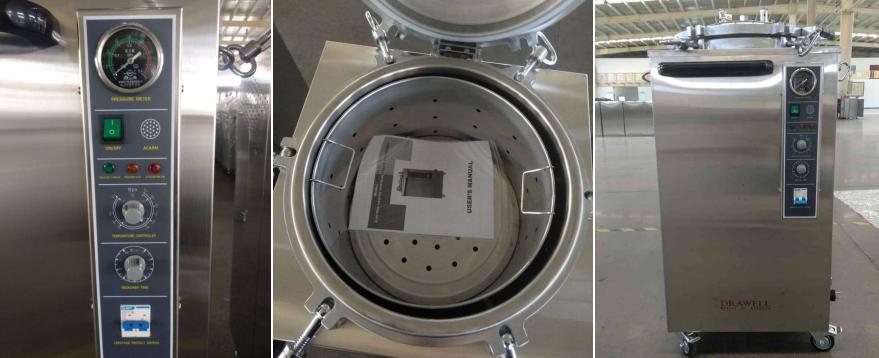
Autoclaves are basically essential sterilization devices that rely on high-pressure saturated steam to get rid of microorganisms from instruments, laboratory equipment, and a variety of materials. Over time, you can end up with residues from water, certain chemicals, and the actual sterilized loads that kind of build up inside the chamber, plus in the linked components too. If that stuff is never cleaned out, it may cut sterilization efficiency down, raise operating costs, and in some cases, even contribute to equipment damage.
Regular cleaning of an autoclave is what helps keep sterilization performance at its best, makes it easier to stay within regulatory requirements, lowers the chance of maintenance issues, and helps stretch the autoclave service life for a longer run. This article focuses on how to clean an autoclave with a detailed step-by-step process, together with the common mistakes to avoid during the cleaning process.

Common Sources of Autoclave Contamination
Various contaminants can accumulate inside an autoclave during normal operation.
| Contamination Source | Typical Origin | Impact on Autoclave Performance |
| Mineral Deposits (Scale) | Hard water used in steam generation or reservoirs | Reduced heating efficiency, clogged pipes, increased energy consumption |
| Biological Residues | Sterilized laboratory cultures, medical waste, and biological samples | Contamination buildup, unpleasant odors, reduced chamber cleanliness |
| Packaging Materials | Paper wraps, sterilization pouches, labels, and tapes | Debris accumulation in drains and chamber corners |
| Chemical Residues | Cleaning agents, laboratory chemicals, reagents, and disinfectants | Surface corrosion, staining, and possible interference with sterilization cycles |
| Adhesive Residues | Autoclave tape, labels, and stickers | Sticky buildup on trays, racks, and chamber walls |
| Rust and Corrosion Particles | Damaged metal instruments or chamber components | Surface damage, contamination, and reduced equipment lifespan |
| Dust and Environmental Particles | Airborne contaminants entering during loading and unloading | Chamber contamination and reduced cleanliness standards |
| Drain Debris | Broken glass, paper fragments, packaging scraps, and biological materials | Blocked drains, poor steam circulation, cycle failures |
| Residual Moisture | Standing water left after sterilization cycles | Microbial growth and corrosion risks |
| Lubricant or Mechanical Residues | Door hinges, seals, and moving mechanical components | Contamination of sterilized loads and chamber surfaces |
A Step-by-Step Process of Cleaning an Autoclave
Step 1. Allow the Autoclave to Cool and Shut Down Safely
The cleaning process starts only when the sterilization cycle of an autoclave has finished and also cooled to a safe temperature. If you try to scrub a still-hot chamber, operators can get burned, and some delicate parts may be harmed too. After cooling, switch off the power, following the manufacturer’s directions exactly. If needed, disconnect the unit from the power source so the workspace stays secure during maintenance.
Step 2. Prepare the Cleaning Area and Materials
Before anything gets cleaned, you should gather the necessary cleaning materials and set up a clean workspace. Use soft cloths, non-abrasive sponges, mild detergents, and cleaning solutions that the manufacturer approves. These are generally used to lift contaminants without harming stainless steel surfaces. Also, make sure you wear proper protective gear, so the personnel aren’t exposed to residues or to the cleaning agents themselves. If you do this preparation first, the cleaning work usually feels more efficient and the chance of accidental damage goes down.
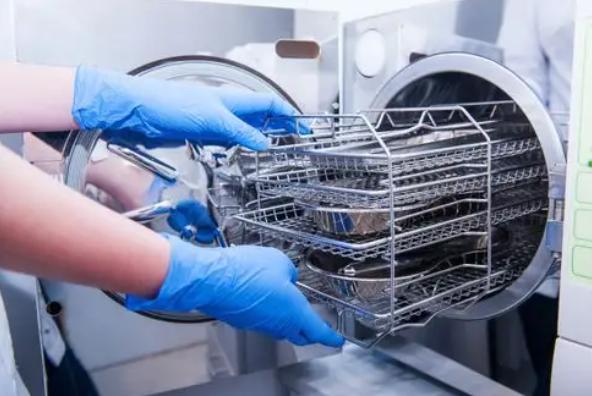
Step 3. Remove Internal Components
Once the autoclave door is open, the removable pieces should be taken out of the chamber right away. These pieces might be trays, racks, shelves, baskets, and also instrument holders. When they are out, the interior gets clear access, so the operator can reach every area more easily and each component can be cleaned independently. While removing, the staff should check the parts for signs of wear, corrosion, or other physical damage, since these issues can interfere with sterilization performance.
Step 4. Clean the Chamber Interior
The inside chamber is probably the most critical area on the autoclave to clean, because it is exposed right to steam, contaminants and also the sterilized items each time you run a cycle. Take a soft cloth lightly dampened with a gentle cleaning solution, then wipe all chamber surfaces thoroughly, without skipping small spots. Give extra care to corners, the seams, and the regions around steam ports, since residues tend to build up there more often. If marks or leftover film won’t come off easily, you can use approved cleaning agents, but follow the manufacturer instructions exactly, ok. When you are finished, rinse the chamber with clean water and dry it completely so you do not leave moisture behind that could trigger corrosion.
Step 5. Wash Trays, Racks, and Accessories
The removable trays and the racks should be cleaned separately, using warm water and a gentle detergent. Over time, these parts can build up packaging debris, adhesive residues, and discoloration from repeated sterilization cycles. A thorough scrub helps clear away those contaminants, and it supports a clean sterilization environment. Afterward, every accessory must be rinsed carefully, then left to air dry fully before you place it back into the autoclave.
Step 6. Inspect and Clean the Door Gasket
The door gasket has a crucial job keeping the chamber pressure steady, and stopping steam leakage while the unit is running. Since the gasket sits right where heat, moisture, and pressure swings keep happening, it needs routine checks, plus cleaning. A gentle cloth works best to wipe off dirt and any leftover residue on the gasket face. While cleaning, the operator should pay attention to cracking, hardening, distortion, or any excessive wear. If the gasket gets damaged, sterilization can be compromised, and that situation should be fixed quickly.
Step 7. Clean the Drain and Strainer
During regular maintenance the drainage system is easily missed, but it is also one of the usual spots where contamination builds up. Paper bits, wrapping materials, biological residues, and mineral sediment can gather in the drain and the strainer over time. These blockages may hamper steam circulation and reduce proper water flow during sterilization cycles. By rinsing the strainer and clearing out the piled debris, operation stays efficient and sudden cycle failures are avoided.
Step 8. Clean the Water Reservoir
For autoclaves that have water reservoirs, periodic cleaning is essential to keep steam quality good and to avoid contamination issues. The reservoir should be drained completely before the actual cleaning. Any sediment, mineral buildup, or microbial growth needs to be taken out, using cleaning solutions that are approved. After that, the reservoir should be rinsed very well and refilled with distilled water or deionized water, if the manufacturer says to do that. Keeping the water supply clean helps reduce scaling and makes sterilization results more consistent.
Step 9. Remove Mineral Scale Through Descaling
Mineral scaling shows up a lot in autoclaves, especially in areas where hard water gets used regularly. Those scale build ups can settle on chamber surfaces, heating elements, and even the internal plumbing. As a result heat transfer becomes less efficient and energy use tends to jump. Doing periodic descaling with approved descaling agents helps break down these deposits and bring performance back to where it should be. After the descaling step the system needs to be rinsed thoroughly, to clear out any remaining chemical residues before you return the autoclave to service.
Step 10. Reassemble and Inspect the Equipment
Once every component is washed and fully dried, you can reassemble the autoclave. Trays, racks, strainers, and other removable pieces should go back to their correct spots. Before you close the chamber, do a last quick inspection, just to confirm that no cleaning materials or leftovers remain inside the unit. This final check supports the idea that the autoclave is ready for safe operation.
Step 11. Perform a Verification Cycle
After the reassembly is done, you should run some sort of test or verification cycle. Doing an empty cycle helps operators confirm that the autoclave is working properly and that steam production, pressure regulation, and drainage systems are operating as expected. If anything odd happens, like unusual sounds, leaks, or poor performance noticed during the cycle, that should be examined first, before the autoclave is used for regular sterilization.
Establishing a Cleaning Schedule for Autoclave Cleaning
A preventive cleaning schedule tailored to autoclave workload, water quality, and application type helps maximize sterilization efficiency of an autoclave.
| Cleaning Task | Frequency | Purpose | Key Areas Involved |
| Wipe Chamber Interior | Daily or After Each Heavy-Use Cycle | Remove moisture, stains, and loose debris before buildup occurs | Chamber walls, floor, ceiling, steam ports |
| Inspect Door Gasket | Daily | Ensure proper sealing and identify early signs of wear or damage | Door seal, gasket surface |
| Clean Trays and Racks | Weekly | Remove residues, packaging debris, and contaminants from load-supporting components | Trays, shelves, baskets, racks |
| Clean Drain Strainer | Weekly | Prevent drainage blockages and maintain proper steam circulation | Drain screen, drain opening |
| Inspect Chamber for Corrosion or Staining | Weekly | Detect early signs of damage that could affect performance | Chamber surfaces, corners, welds |
| Clean Water Reservoir | Monthly | Prevent sediment accumulation and microbial growth | Water tank, reservoir connections |
| Perform Descaling Procedure | Monthly or As Needed | Remove mineral deposits that reduce heating efficiency | Chamber, piping, heating elements |
| Inspect Steam Lines and Connections | Quarterly | Ensure proper steam delivery and identify leaks or wear | Steam pipes, fittings, valves |
| Verify Safety Devices and Sensors | Quarterly | Maintain operational safety and performance accuracy | Pressure gauges, temperature sensors, safety valves |
| Conduct Comprehensive Maintenance Inspection | Annually | Evaluate overall equipment condition and prevent major failures | Entire autoclave system |
Common Mistakes to Avoid During the Process of Cleaning an Autoclave
Avoiding these common mistakes ensures the safe operation of an autoclave.
| Common Mistake | Why It Happens | Potential Consequences | Recommended Practice |
| Cleaning While the Autoclave Is Still Hot | Rushing maintenance procedures | Risk of burns, injury, and damage to components | Allow the autoclave to cool completely before cleaning |
| Using Abrasive Brushes or Steel Wool | Attempting to remove stubborn stains quickly | Scratched chamber surfaces, corrosion, and contamination buildup | Use soft cloths, non-abrasive sponges, and approved cleaning tools |
| Using Harsh Chemical Cleaners | Lack of awareness of material compatibility | Surface damage, gasket deterioration, and corrosion | Follow manufacturer-approved cleaning recommendations |
| Neglecting the Drain Strainer | Focusing only on visible chamber surfaces | Drain blockages, poor steam circulation, and cycle failures | Inspect and clean the drain system regularly |
| Ignoring Door Gasket Maintenance | Overlooking less visible components | Steam leaks, pressure loss, and sterilization inefficiency | Clean and inspect the gasket during every maintenance cycle |
| Failing to Rinse Cleaning Residues | Incomplete cleaning process | Chemical contamination and chamber staining | Thoroughly rinse all cleaned surfaces with clean water |
| Using Tap Water in Reservoirs | Convenience or lack of awareness | Mineral scale buildup and reduced heating efficiency | Use distilled or deionized water whenever recommended |
| Skipping Routine Descaling | Scale deposits are not immediately visible | Reduced heat transfer, increased energy use, and equipment wear | Follow a regular descaling schedule |
| Reassembling Wet Components | Attempting to return the unit to service too quickly | Corrosion, microbial growth, and water contamination | Dry all parts completely before reinstallation |
| Not Performing a Test Cycle After Cleaning | Assuming the autoclave is ready for use | Undetected leaks, drainage issues, or performance problems | Run an empty verification cycle before regular operation |
Final Thoughts
Following a step-by-step process for cleaning an autoclave, helps make sure sterilization stays dependable, it also lowers contamination exposure, and it extends the equipment service life a bit more. If the chamber, accessories, the gasket, the drainage pathway, and the water reservoir are cleaned on a routine basis, operators can keep proper output and reduce those awkward, unexpected downtime events. This steady maintenance, doesn’t only protects valuable instruments, but it also supports a safe, efficient sterilization outcome across lab work, medical settings, and industrial jobs.
Get Quote Here!
Latest Posts


What Next?
For more information, or to arrange an equipment demonstration, please visit our dedicated Product Homepage or contact one of our Product Managers.


